Flauth 🔐
Flauth is a privacy-first, fully open-source TOTP authenticator. It offers both a GUI app (Android, macOS, Windows, Linux) and a lightweight CLI for viewing tokens directly in your terminal.
Download Latest Release | F-Droid | GitHub
🌟 Why Flauth?
- 100% Open Source: Transparent and trustable code. Your secrets never leave your device unless you choose to sync them.
- Flexible Backups:
- Security Logic: Detailed backup and restore mechanisms.
- Local Backup: Export/Import accounts as standard text files using system file pickers.
- WebDAV Sync: Seamlessly sync your data with your private cloud (Nextcloud, Nutstore, etc.).
- Privacy & Security:
- Security Architecture: Detailed security implementation.
- Encrypted Storage: Secrets are encrypted and stored in the device’s secure element (Keychain on iOS/macOS, Keystore on Android).
- Modern UI: Focused on simplicity. Built with Material 3, supporting adaptive light and dark modes.
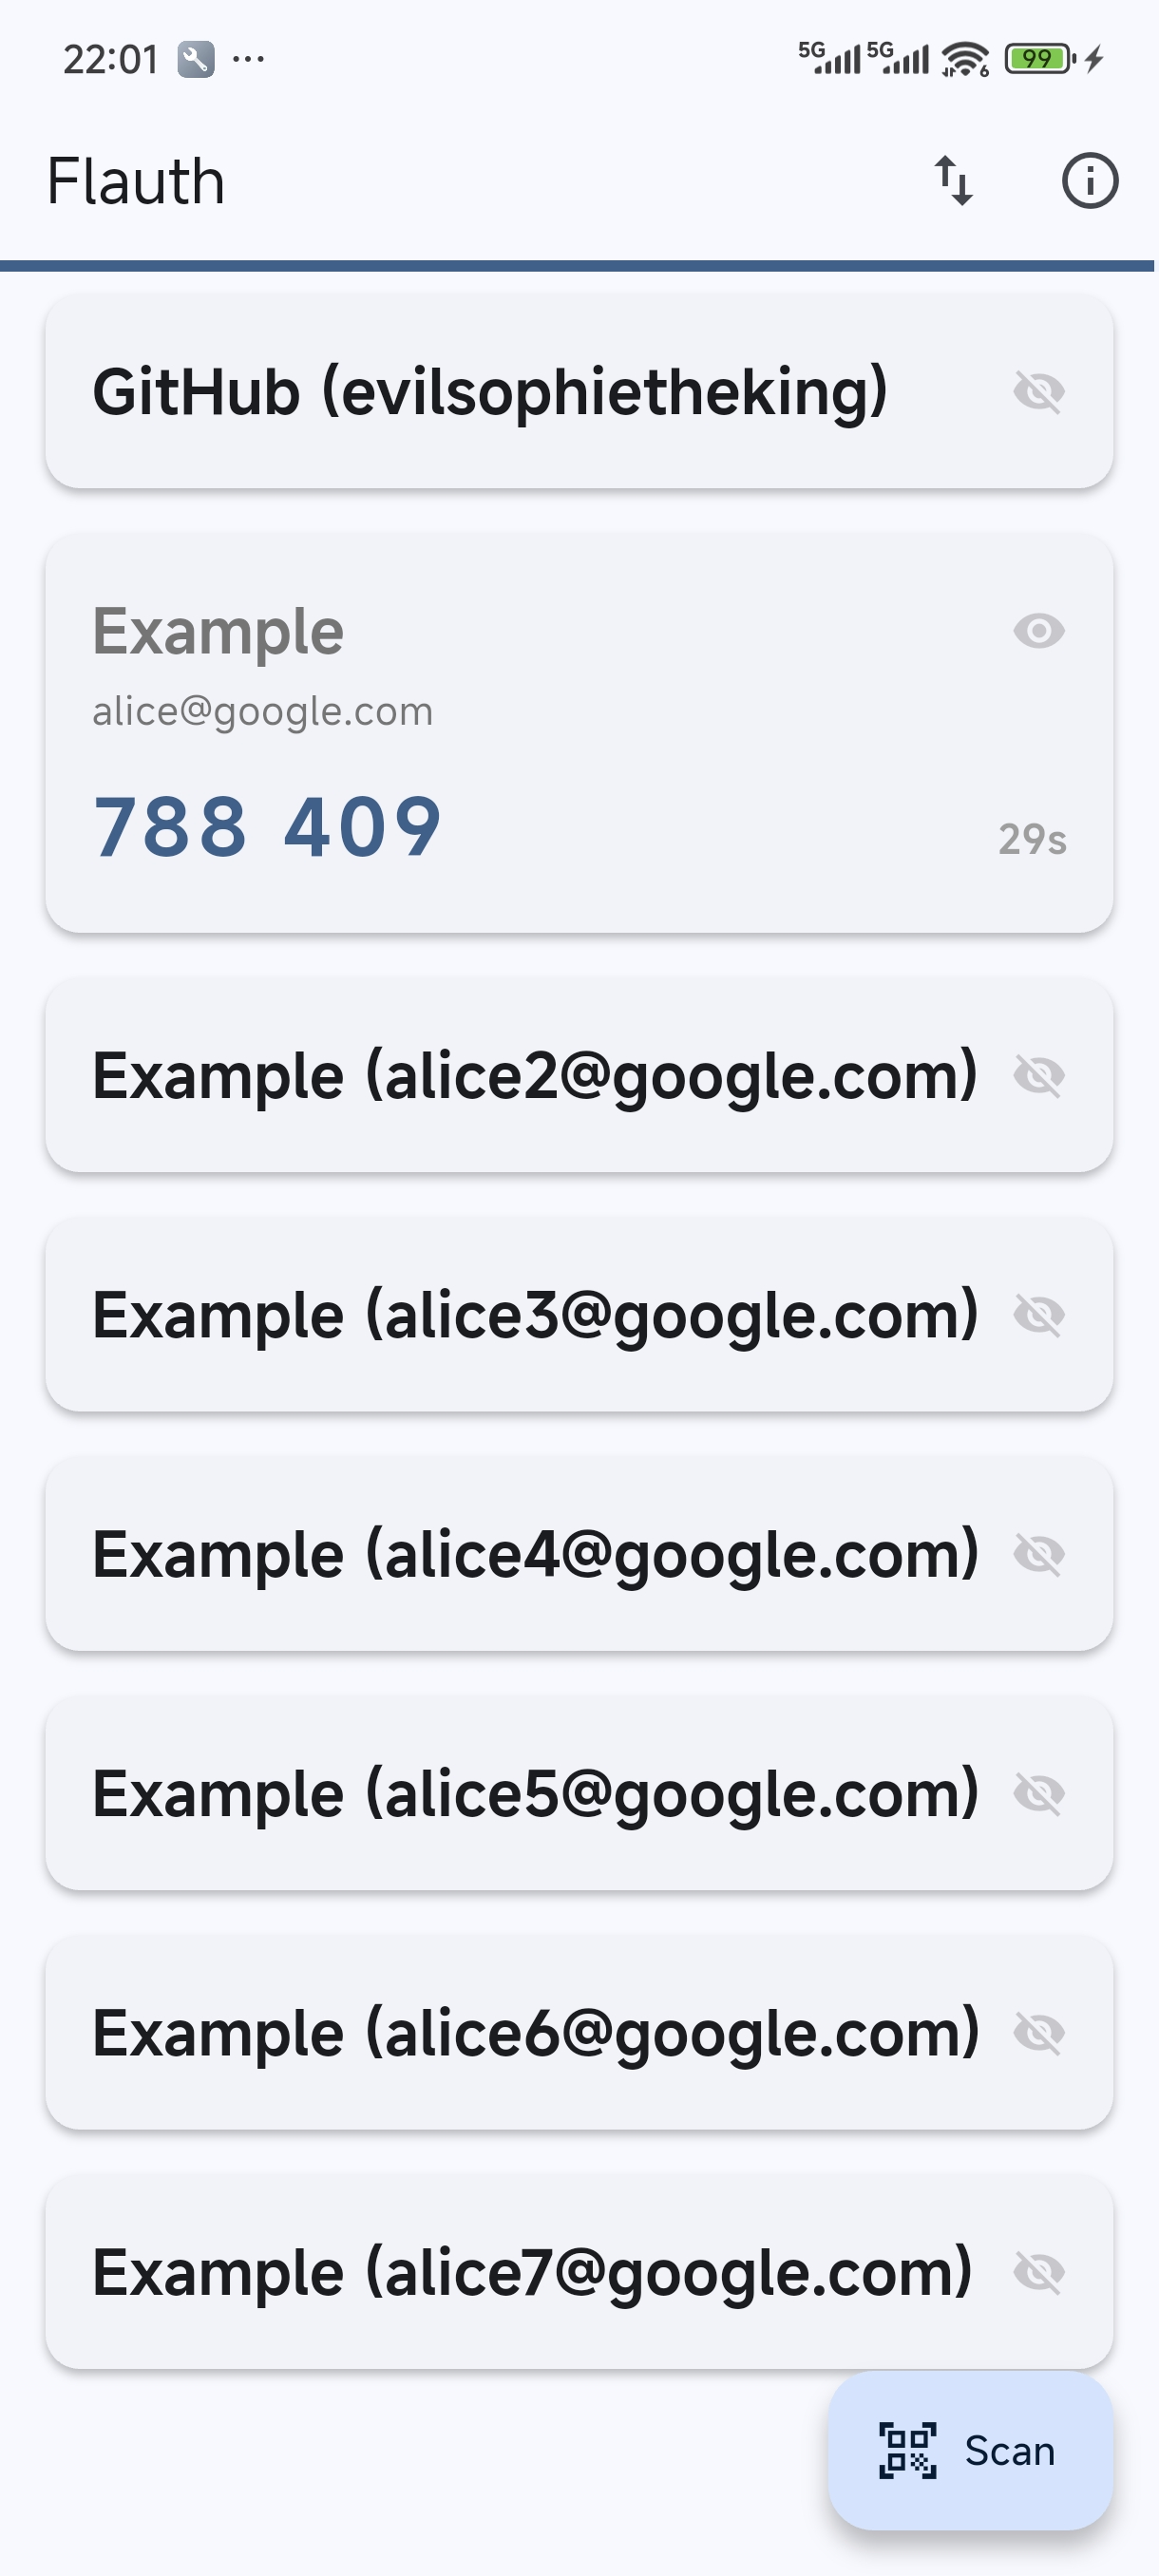
📸 Screenshots
⬇️ Download
You can download Flauth from the following sources:
- F-Droid: The privacy-respecting FOSS Android app store.
- GitHub Releases: Pre-compiled binaries for all supported platforms (Android APK, macOS, Linux, and Windows).
⌨️ CLI
For a lightweight experience, Flauth also provides a command-line tool to view TOTP tokens directly in your terminal — no GUI needed.
Pre-compiled binaries for Linux, macOS, and Windows are available on the GitHub Releases page.
Quick Install
curl -fsSL https://jiacai2050.github.io/flauth/install.sh | sh
For users in China:
curl -fsSL https://jiacai2050.github.io/flauth/install.sh | sh -s -- --china
Run install.sh --help for more options (e.g. --version, --prefix).
Usage
# Set the backup file path
export FLAUTH_BACKUP_FILE=/path/to/backup.flauth

# Show all tokens
flauth-cli

# Filter by keyword
flauth-cli github

# Show help
flauth-cli --help
🛡️ Permissions
- Camera: To scan QR codes for adding accounts.
- Local Storage/Network: To backup/restore accounts locally or via WebDAV.
📄 License
This project is licensed under the MIT License.
Backup & Restore Logic
This document describes the implementation details of Flauth’s backup and restore system, covering local file exports and WebDAV cloud synchronization.
1. Overview
Flauth supports two backup methods:
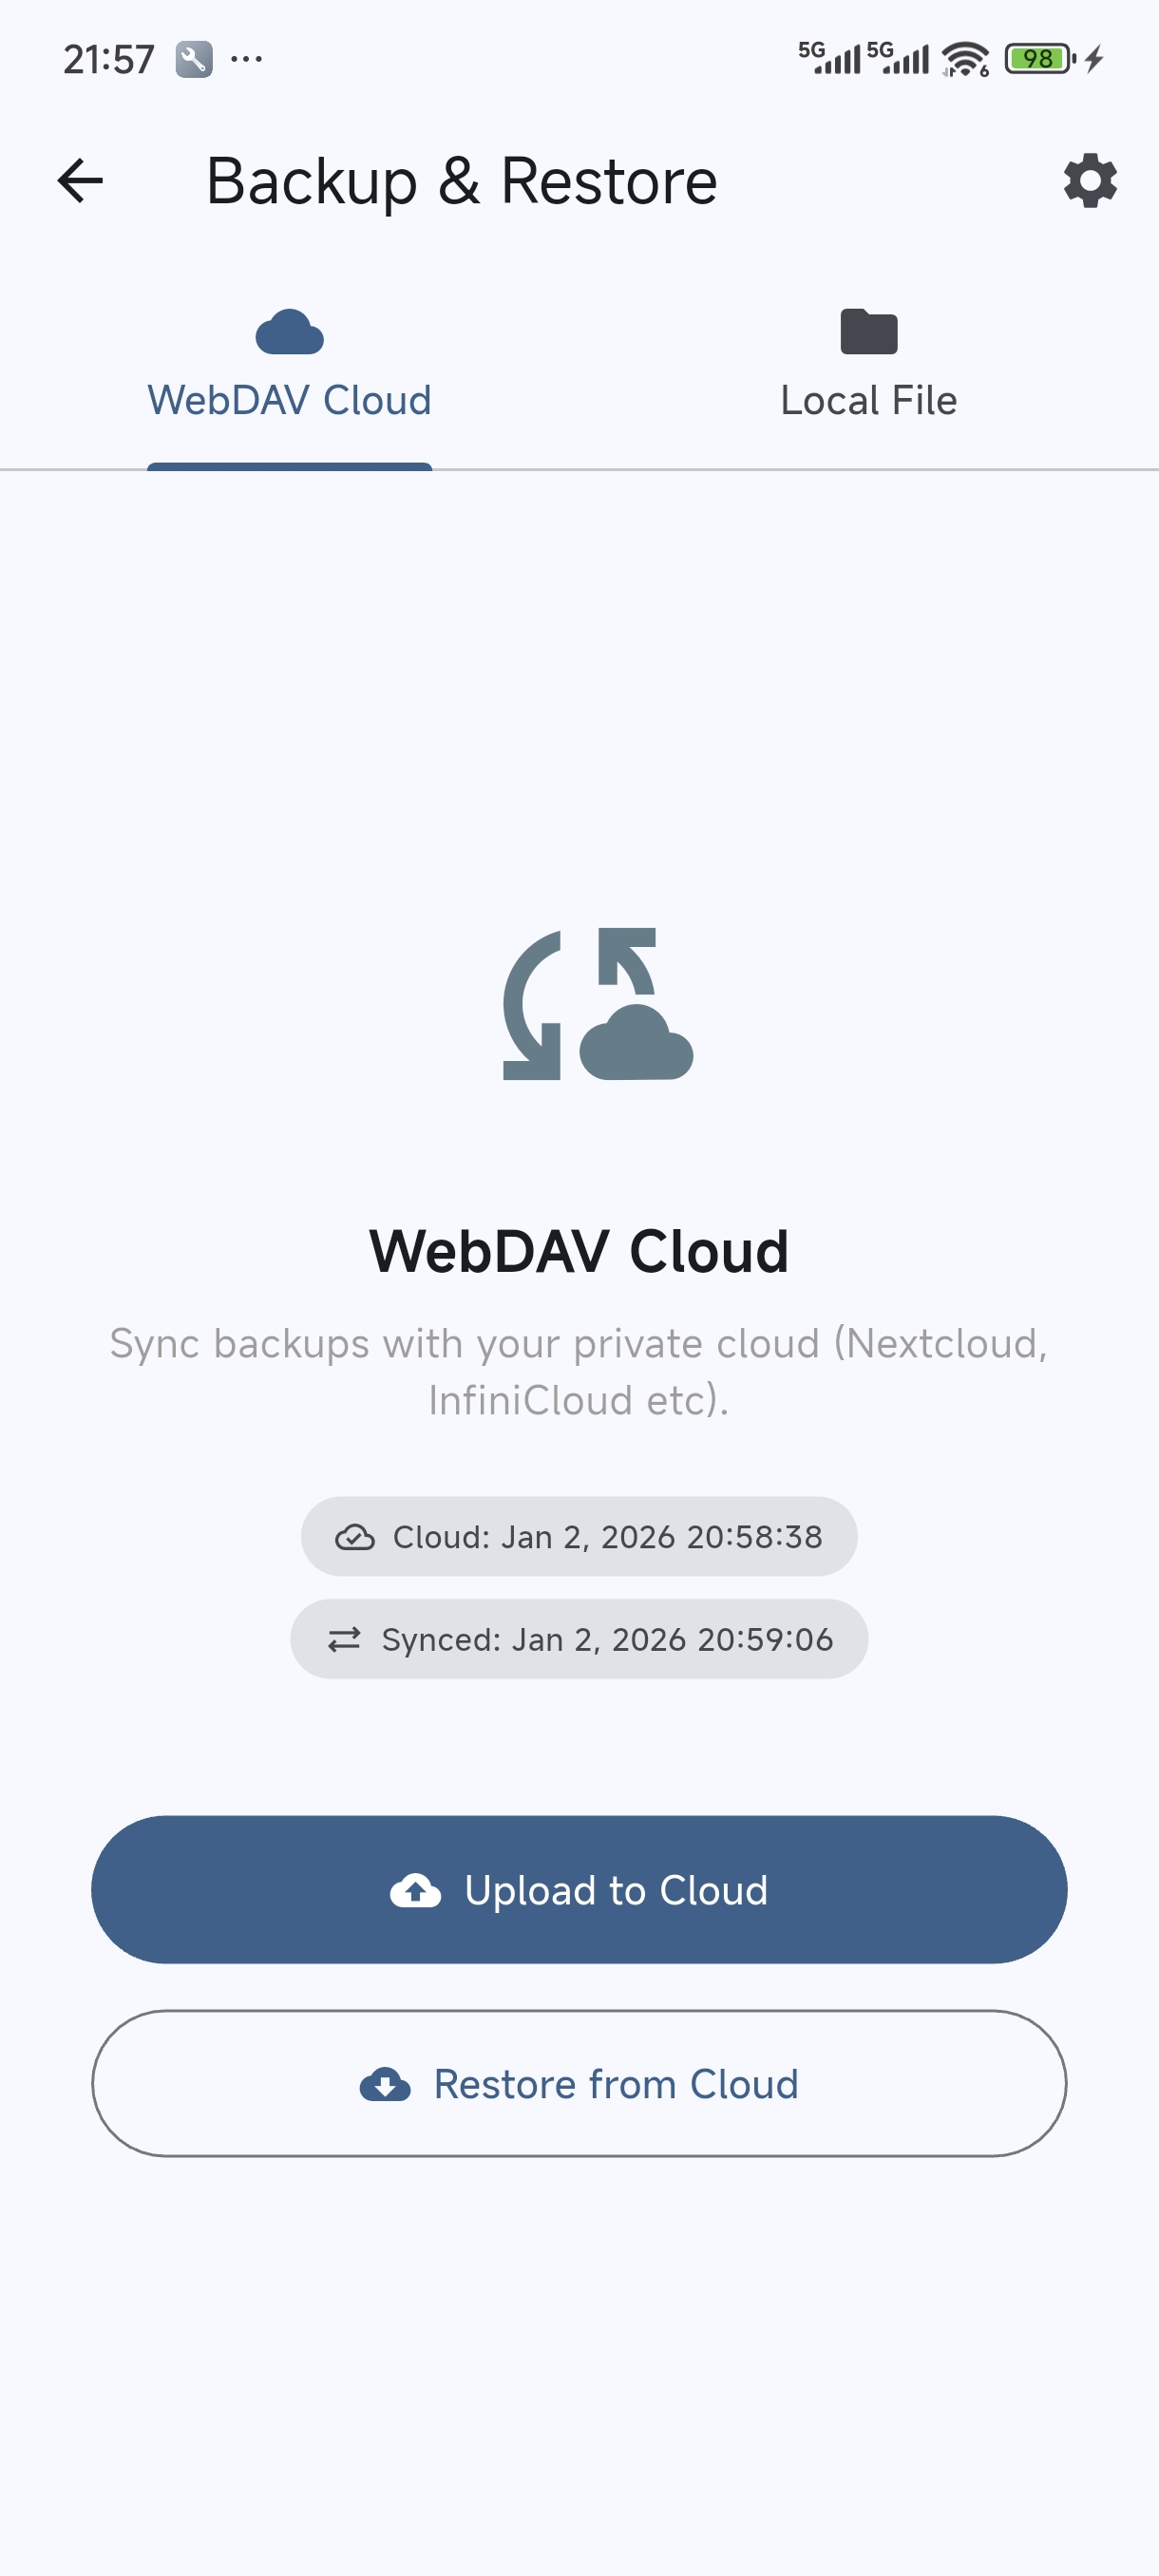
- Local File: Export accounts to a file on your device or import from an existing file.
- WebDAV Sync: Synchronize your accounts with a private cloud (e.g., Nextcloud, Nutstore) using the WebDAV protocol.
Both methods share the same underlying security architecture.
2. Security Architecture
To ensure the safety of your 2FA secrets, Flauth provides industry-standard encryption for backup files.
2.1 Encryption Standard
- Algorithm: AES-256-CBC (Advanced Encryption Standard).
- Key Derivation: PBKDF2 (Password-Based Key Derivation Function 2) with HMAC-SHA256.
- Iterations: 10,000 rounds (balances performance and security).
- Salting: A unique 16-byte random salt is generated for every backup to prevent rainbow table attacks.
- IV: A 16-byte random Initialization Vector is used for every encryption to ensure uniqueness.
2.2 File Formats
Flauth unifies all backup files with the .flauth extension. The app automatically detects whether the file is encrypted or plain text during the import process.
Encrypted Format
Encrypted backups are stored as a JSON container:
{
  "version": 1,
  "kdf": {
    "algorithm": "pbkdf2",
    "iterations": 10000,
    "salt": "<Base64 encoded salt>"
  },
  "encryption": {
    "algorithm": "aes-256-cbc",
    "iv": "<Base64 encoded IV>",
    "data": "<Base64 encoded ciphertext>"
  }
}
Plain Text Format
If the user chooses to skip encryption, accounts are exported as a simple list of otpauth:// URIs, one per line (still saved with the .flauth extension).
3. Workflows
3.1 Export Workflow
- Collect Data: Gather all accounts and convert them to
otpauth://URIs. - Security Choice: Prompt the user to enter a password (minimum 6 characters) or skip encryption.
- Encryption: If a password is provided, derive a 256-bit key and encrypt the content.
- Save/Upload:
- Local: Use the system file picker to save the
.flauthfile (encrypted or plain text). - WebDAV: Upload the content to the configured remote path (defaults to
backup-otpauth.flauth).
- Local: Use the system file picker to save the
3.2 Import Workflow
- Read Content: Load the file string from local storage or download from WebDAV.
- Detection: Automatically check if the content is a JSON container with the expected encryption keys.
- Decryption:
- If encrypted, prompt the user for the password.
- Re-derive the key using the salt and iterations stored in the JSON.
- Perform AES decryption.
- Parsing: Parse the resulting URI list and add new accounts to the local secure storage (skipping duplicates).
4. Platform Specifics (macOS)
For macOS users running the app in a development environment without official code signing, Flauth handles entitlements carefully to ensure the file picker functions correctly within the App Sandbox.
Flauth Authentication Architecture
This document details the security implementation mechanisms of Flauth, including PIN protection, biometric integration, and interaction logic.
1. Core Security Strategy: Two-Tier Protection
Flauth employs a Application-Level Independent Authentication combined with System-Level Biometrics.
- Tier 1 (Biometrics): Uses the
local_authplugin to invoke iOS (FaceID/TouchID) or Android (Fingerprint/Face).- Android Implementation: The host Activity extends
FlutterFragmentActivityand applies theTheme.MaterialComponentstheme to ensure perfect compatibility with the system-levelBiometricPrompt.
- Android Implementation: The host Activity extends
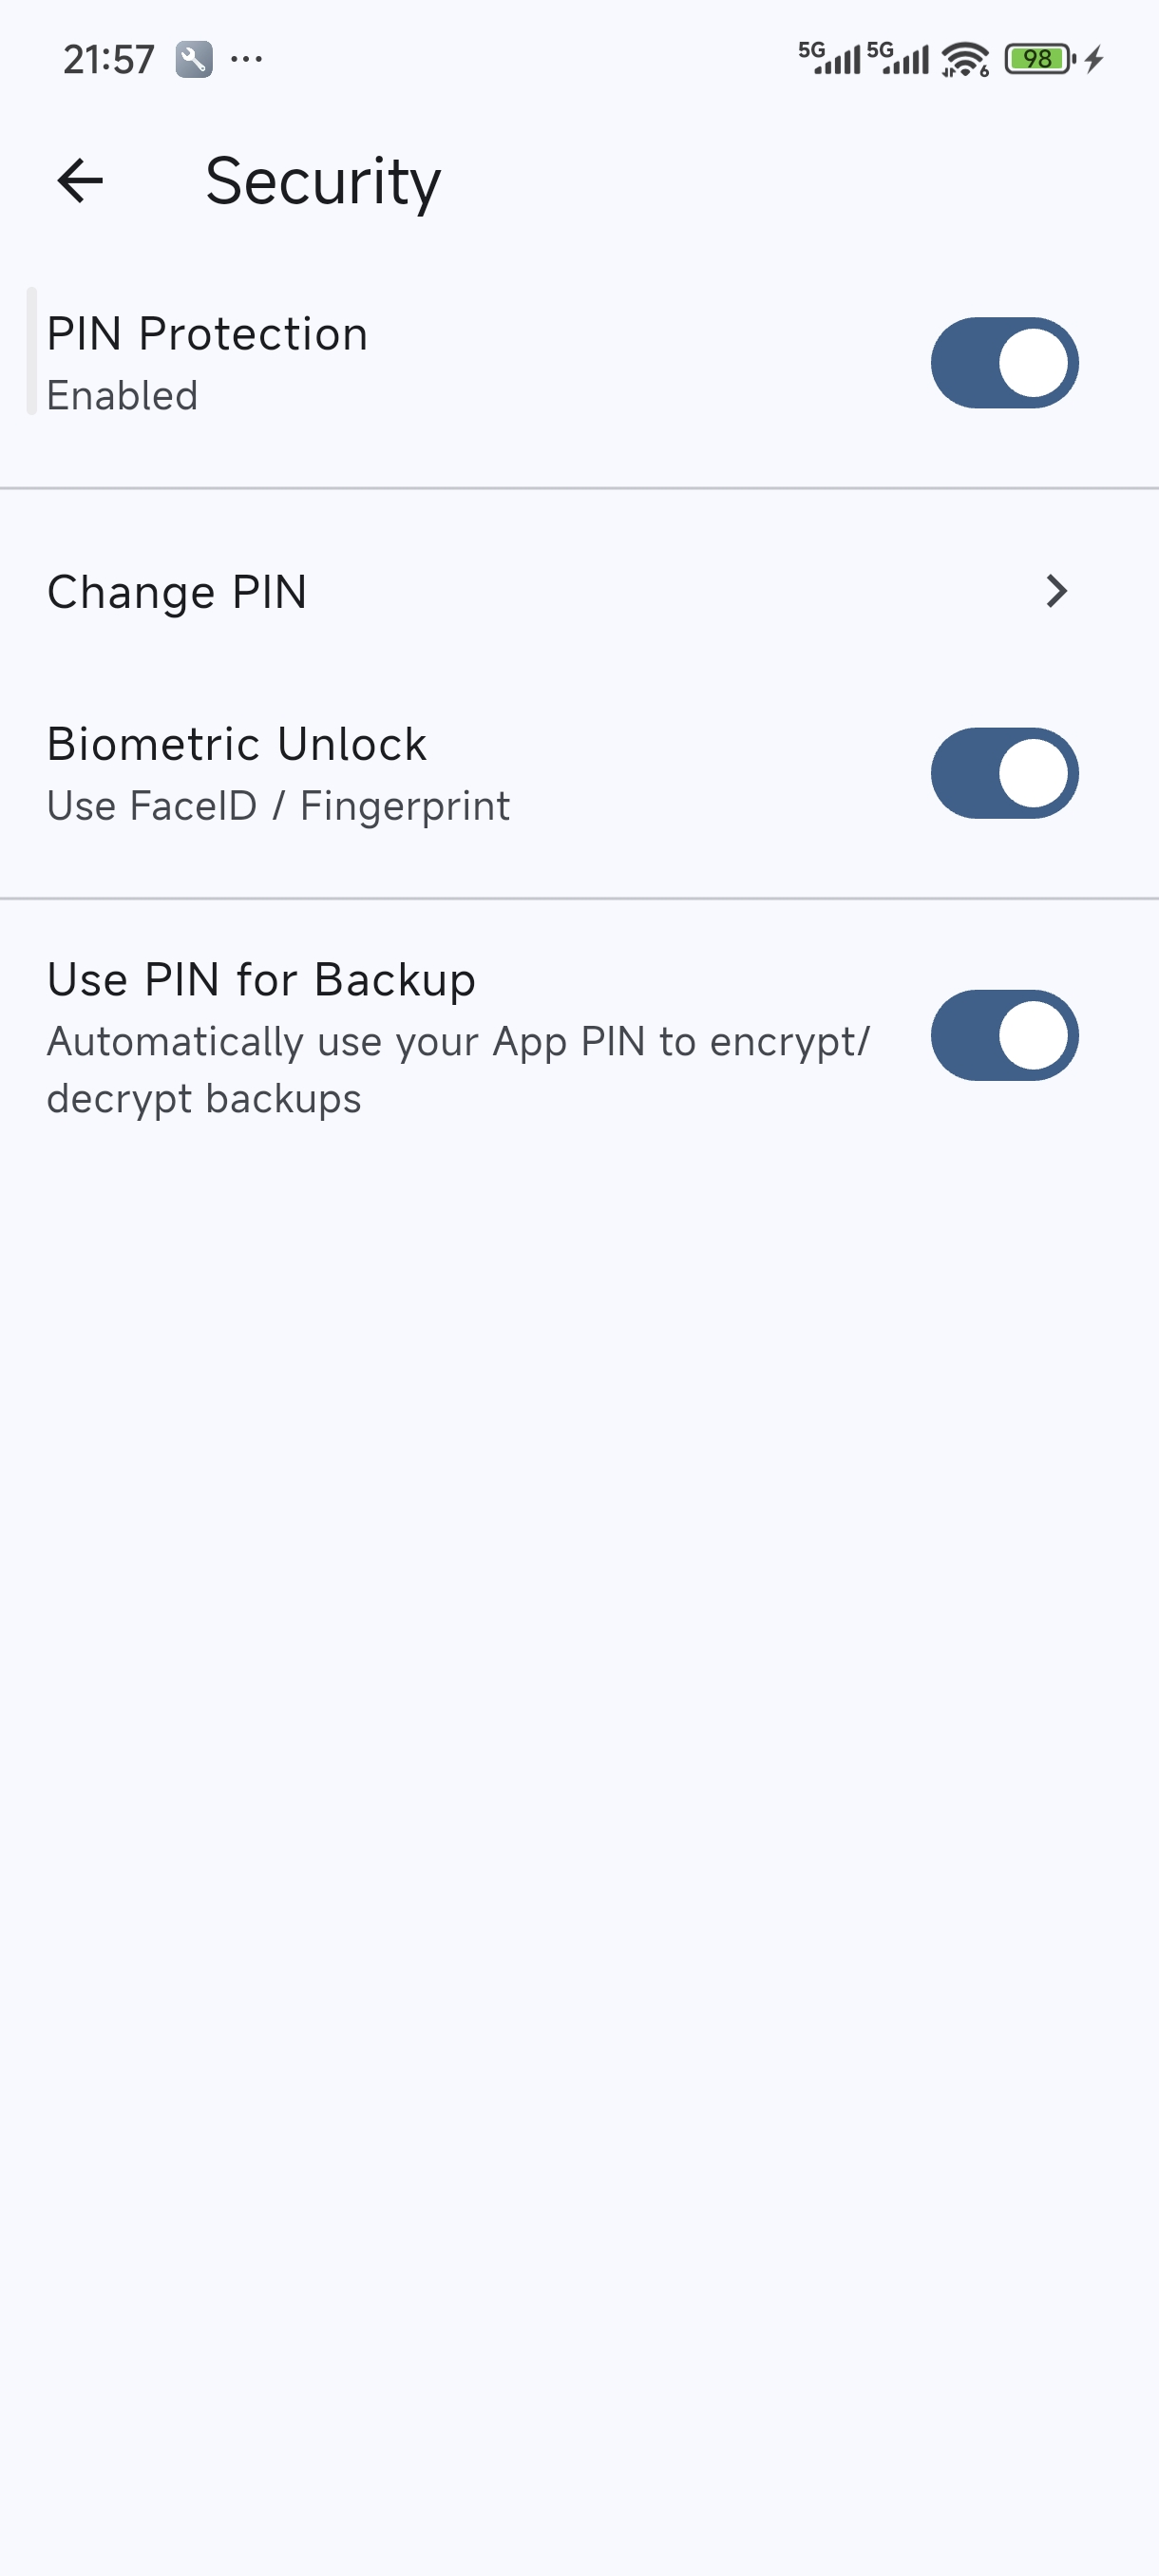
- Tier 2 (Custom PIN): A 4-digit numeric password maintained by the application itself. This is the core fallback mechanism, establishing an independent defense boundary.
2. Storage Design (Storage Service)
All sensitive information is stored in flutter_secure_storage (using encrypted Shared Preferences/Keystore on Android and Keychain on iOS):
- auth_pin: Stores the user-set PIN.
- auth_biometric_enabled: Boolean, marks whether the user has authorized biometric use.
- auth_failed_attempts: Number of consecutive incorrect entries.
- auth_lockout_end: ISO8601 timestamp for when the lockout ends.
- auth_pin_skipped: Marks whether the user chose to skip the initial setup.
3. Authentication Flow
3.1 Startup & Lifecycle Management
- Initialization:
AuthProviderchecks the existence ofauth_pinand the lockout status. - Lock Check: If the current time is earlier than
auth_lockout_end, the UI disables input and shows a countdown. - Auto-Auth: If not locked and biometrics are enabled,
AuthScreenautomatically pops up the verification dialog after the first frame is rendered. - Background Auto-Lock:
- When the app enters the background, the current timestamp is recorded.
- When the app returns to the foreground, it checks the duration of absence. If the absence exceeds the 30-second Grace Period, the app forces a switch back to the unauthorized state, requiring re-authentication.
3.2 Verification Path & Anti-Brute Force
graph TD
    A[Enter AuthScreen] --> L{Check Lock Status?}
    L -- Locked --> M[Show Countdown/Disable Input]
    M --> |Countdown Ends| L
    L -- Not Locked --> B{Biometrics Enabled?}
    B -- Yes --> C[Show FaceID/Fingerprint]
    C -- Success --> D[Unlock to HomeScreen]
    C -- Failure/Cancel --> E[Wait for Manual PIN]
    B -- No --> E
    E --> F{PIN Matches?}
    F -- Yes --> D
    F -- No --> G[Fail Count +1]
    G --> H{Fail >= 5?}
    H -- Yes --> I[Set 30s Lockout]
    I --> L
    H -- No --> J[Show Remaining/Vibrate]
    J --> E
4. Platform Compatibility
- Android:
- Minimum Supported Version: Android 9.0 (SDK 28).
- Build Config: Uses Java 11 and modern Kotlin compiler configuration.
- Theming: Uses Material Components theme architecture (
LaunchThemeandNormalThemeboth extendTheme.MaterialComponents) to ensure consistent and stable fingerprint dialog styles across various device brands.
- iOS:
- Uses standard FaceID/TouchID authentication.
- Desktop:
- Currently only supports PIN authentication.
5. Security Features
- Isolation: Does not reuse the phone’s lock screen password. Even if the phone password is compromised, the 2FA tokens remain secure.
- Anti-Brute Force: 5 consecutive incorrect entries force a 30-second lockout. The lockout state is persisted and cannot be reset by restarting the app.
- Leak Prevention:
AuthScreenacts as an overlay; TOTP secrets are not decrypted in memory until verification passes. - Lifecycle Awareness: Uses
WidgetsBindingObserverto monitor app state in real-time, preventing content from being viewed when the app is in the background.
6. Design Trade-offs
We chose a “Custom PIN” over “Reusing System Password” to address the risk of “Phone being snatched/borrowed while unlocked”. Although this increases the memory burden on the user, for an authenticator app managing account access rights, security is the primary priority. At the same time, the introduction of the 30-second background grace period balances security with the usability of frequent app switching.
Importing from Aegis Authenticator
Aegis is a popular open-source 2FA manager for Android. Migrating your accounts from Aegis to Flauth is simple and efficient.
Recommended Method: URI List Import
This method allows you to migrate all accounts at once using Flauth’s local import feature.
Step 1: Export from Aegis
- Open Aegis on your Android device.
- Tap the Settings (gear icon) or the three-dot menu.
- Go to Import / Export.
- Select Export.
- Choose Plain-text JSON or Plain-text URI list.
- Note: Flauth prefers the URI list for direct compatibility.
- Tap Export to file and save it to your device.
Step 2: Prepare the file
Flauth recognizes files with the .flauth extension.
- Locate the file you just exported (usually named
aegis-export-....txtor.json). - Rename the file extension to
.flauth. For example:otpauth-backup.flauth.
Step 3: Import into Flauth
- Open Flauth.
- Go to Backup & Restore from the home screen menu.
- Switch to the Local File tab.
- Tap Import from File.
- Select your
.flauthfile. - Flauth will display a message confirming how many new accounts were imported.
Alternative Method: QR Code (One-by-one)
If you only have a few accounts, you can scan them individually:
- In Aegis, long-press an account and select Show QR code.
- In Flauth, tap the [+] button on the home screen.
- Select Scan QR Code and scan the screen.
⚠️ Security Note
After a successful import, please immediately and securely delete the plain-text export file from Aegis, as it contains your unencrypted 2FA secrets.
Android Signing Guide
This document describes how to configure Android app signing for Flauth, both for local development and automated CI/CD using GitHub Actions.
1. Local Development Setup
To build a signed release APK locally, follow these steps:
Step 1: Create a Keystore
If you don’t have one, generate a keystore file:
keytool -genkey -v -keystore upload-keystore.jks -keyalg RSA -keysize 2048 -validity 10000 -alias upload
Step 2: Configure key.properties
Create a file at android/key.properties (this file is ignored by Git):
storePassword=your_keystore_password
keyPassword=your_key_password
keyAlias=upload
storeFile=upload-keystore.jks
Step 3: Build
Run the release build command:
flutter build apk --release
The build system will automatically detect key.properties and use your JKS file. If the file is missing, it will fallback to debug signing.
3. Verifying the Signature
After building the APK, you can verify if it was signed correctly using the apksigner tool (part of the Android SDK Build Tools).
On macOS, it’s typically located at:
~/Library/Android/sdk/build-tools/<version>/apksigner
Example command:
~/Library/Android/sdk/build-tools/34.0.0/apksigner verify --print-certs --verbose build/app/outputs/flutter-apk/app-release.apk
Check the output for the Signer #1 certificate DN and SHA-256 digest to ensure they match your keystore.
4. F-Droid & Third-party Builds
Our android/app/build.gradle.kts is designed to be environment-agnostic:
- If signing keys are present, it produces a signed release.
- If keys are missing (like on F-Droid build servers), it falls back to debug signing automatically. This ensures the source code remains buildable by anyone without needing private keys.
Release
This document describes how to release Flauth to various platforms.
Prerequisites
- The release commit is tagged (e.g.,
v1.1.0) metadata/en-US/changelogs/<fdroid-versionCode>.txtis up to date (e.g.,2002.txtfor pubspec+2)- All tests pass:
flutter test
Android (F-Droid)
1. Tag and push the release
git tag v<version>
git push origin v<version>
2. Fork and clone fdroiddata
git clone git@gitlab.com:<your-username>/fdroiddata.git
cd fdroiddata
3. Update the app metadata
Edit metadata/net.liujiacai.flauth.yml:
- Bump
CurrentVersionto the new version (e.g.,1.1.0) - Bump
CurrentVersionCode— calculated aspubspec versionCode + 2000- e.g.,
pubspec.yamlhasversion: 1.1.0+2, so F-Droid versionCode =2 + 2000 = 2002 - This offset is defined by
VercodeOperation: '%c + 2000'in the F-Droid metadata
- e.g.,
- Add a new build entry under
Builds::
  - versionName: 1.1.0
    versionCode: 2002
    commit: v1.1.0
    output: build/app/outputs/flutter-apk/app-release.apk
    srclibs:
      - flutter@stable
    rm:
      - ios
      - macos
      - windows
      - linux
    build:
      - $$flutter$$/bin/flutter pub get
      - $$flutter$$/bin/flutter build apk --release
4. Test the build locally (optional)
fdroid build -v -l net.liujiacai.flauth
5. Submit a merge request
Push the branch and open an MR against fdroid/fdroiddata.
Reference MR: https://gitlab.com/fdroid/fdroiddata/-/merge_requests/38396
6. Wait for review
F-Droid maintainers will review and run the build pipeline. Once merged, the new version appears in the F-Droid repo within the next build cycle (typically 1-3 days).
Performance Design inside Flauth
Flauth is designed to be a high-performance, battery-efficient TOTP authenticator. This document explains the key architectural decisions made to ensure smooth UI interaction even with a high-frequency (100ms) global heartbeat.
1. Global Heartbeat with Granular Updates
The application uses a central AccountProvider that maintains a Timer.periodic running every 100ms.
- Why 100ms? This provides a 10Hz refresh rate, which is the “sweet spot” for
LinearProgressIndicator. It ensures the progress bar moves smoothly across the 30-second TOTP window without looking jittery. - Why Persistent? The timer runs continuously regardless of the account list size. This simplifies the state machine and ensures that the UI is always ready to display the correct progress as soon as an account is added or revealed.
2. Rebuild Optimization (context.select)
The most critical optimization is how individual AccountTile widgets consume data.
The Problem
If every AccountTile used Provider.of<AccountProvider>(context), every single tile would rebuild 10 times per second because the provider notifies listeners every 100ms to update the top progress bar.
The Solution: Selector Pattern
We use context.select<AccountProvider, int>((p) => p.remainingSeconds) inside AccountTile.
- Filtering Notifications: When
notifyListeners()is called,selectexecutes the selector function and compares the returnedintwith the previous value. - Lazy Rebuilding: Since
remainingSecondsonly changes once every 1000ms, theAccountTilewidget ignores 9 out of 10 notifications. - Result: Even with 100+ accounts, the UI thread remains idle most of the time, only updating the specific tiles once per second.
3. Efficient TOTP Generation
TOTP codes are generated using the otp library, which performs HMAC-SHA1 calculations.
- On-Demand Calculation: Codes are not pre-calculated or stored in the provider’s state. Instead, they are calculated during the
buildphase of theAccountTile. - Performance: HMAC-SHA1 is a lightweight cryptographic operation. Modern mobile CPUs can perform thousands of these per second, making it perfectly safe to calculate them during a widget’s 1fps rebuild.
4. Decoupled Services
- StorageService: Uses
flutter_secure_storagewhich offloads sensitive data handling to the OS (Keychain/Keystore). This is an asynchronous operation that doesn’t block the UI thread. - WebDavService: All network I/O and path normalization logic are encapsulated in a static service. This keeps the
AccountProviderclean and focused solely on state management.
5. Summary of UI Refresh Rates
| Component | Refresh Frequency | Strategy |
|---|---|---|
| Global Timer | 100ms (10Hz) | Timer.periodic |
| Progress Bar | 100ms (10Hz) | Direct consumption in HomeScreen |
| Account Tile | 1000ms (1Hz) | context.select optimization |
| WebDAV Sync | On Demand | Manual trigger |
By combining a high-frequency global heartbeat with low-frequency local consumption, Flauth achieves a “silky smooth” feel with minimal battery impact.
TOTP URI Generator
This tool allows you to generate a standard otpauth:// URI and QR code for your 2FA accounts manually. This is useful if you have a plain secret key and want to import it into Flauth (or other authenticators) via QR code.
⚠️ Security Note This generator runs entirely in your browser. No data is sent to any server. However, please ensure you are in a safe environment when handling secret keys.
Generated URI:
ℹ️ How to Import into Flauth If you have multiple accounts to add, you can collect these URIs into a plain text file (one per line), save it with a
.flauthextension, and use the Local File import feature in Flauth.
中文使用说明
- 在上方输入框填写 Issuer (如 GitHub), Account (如 user@mail.com) 和 Secret (密钥)。
- 页面会自动生成二维码和
otpauth://链接。 - 你可以直接用手机扫描二维码,或者:
- 将生成的链接复制并保存到文本文件中(每行一个链接)。
- 将该文件命名为
backup.flauth。 - 在 Flauth 的 Backup & Restore -> Local File 页面选择该文件进行导入。